
Dropship seller store setup
Synkro provides an A-Z solution for connecting with dropship suppliers and importing their products into your dropship seller store. Synkro will keep your imported products and inventory in sync and route any orders which you recieve for the imported items back to the supplier store automatically for fulfillment.
Last updated January 5, 2026
Overview
Synkro provides an A-Z solution for importing products into your dropship seller store and keeping your imported products in sync with the supplier’s product and inventory changes in real time. When you receive an order for an product imported from a supplier, Synkro will automatically route that order to the supplier’s store for completely automated fulfillment.
Step 1: Install Synkro in your dropship seller store
To begin the installation process, install Synkro in your dropship seller Shopify store.
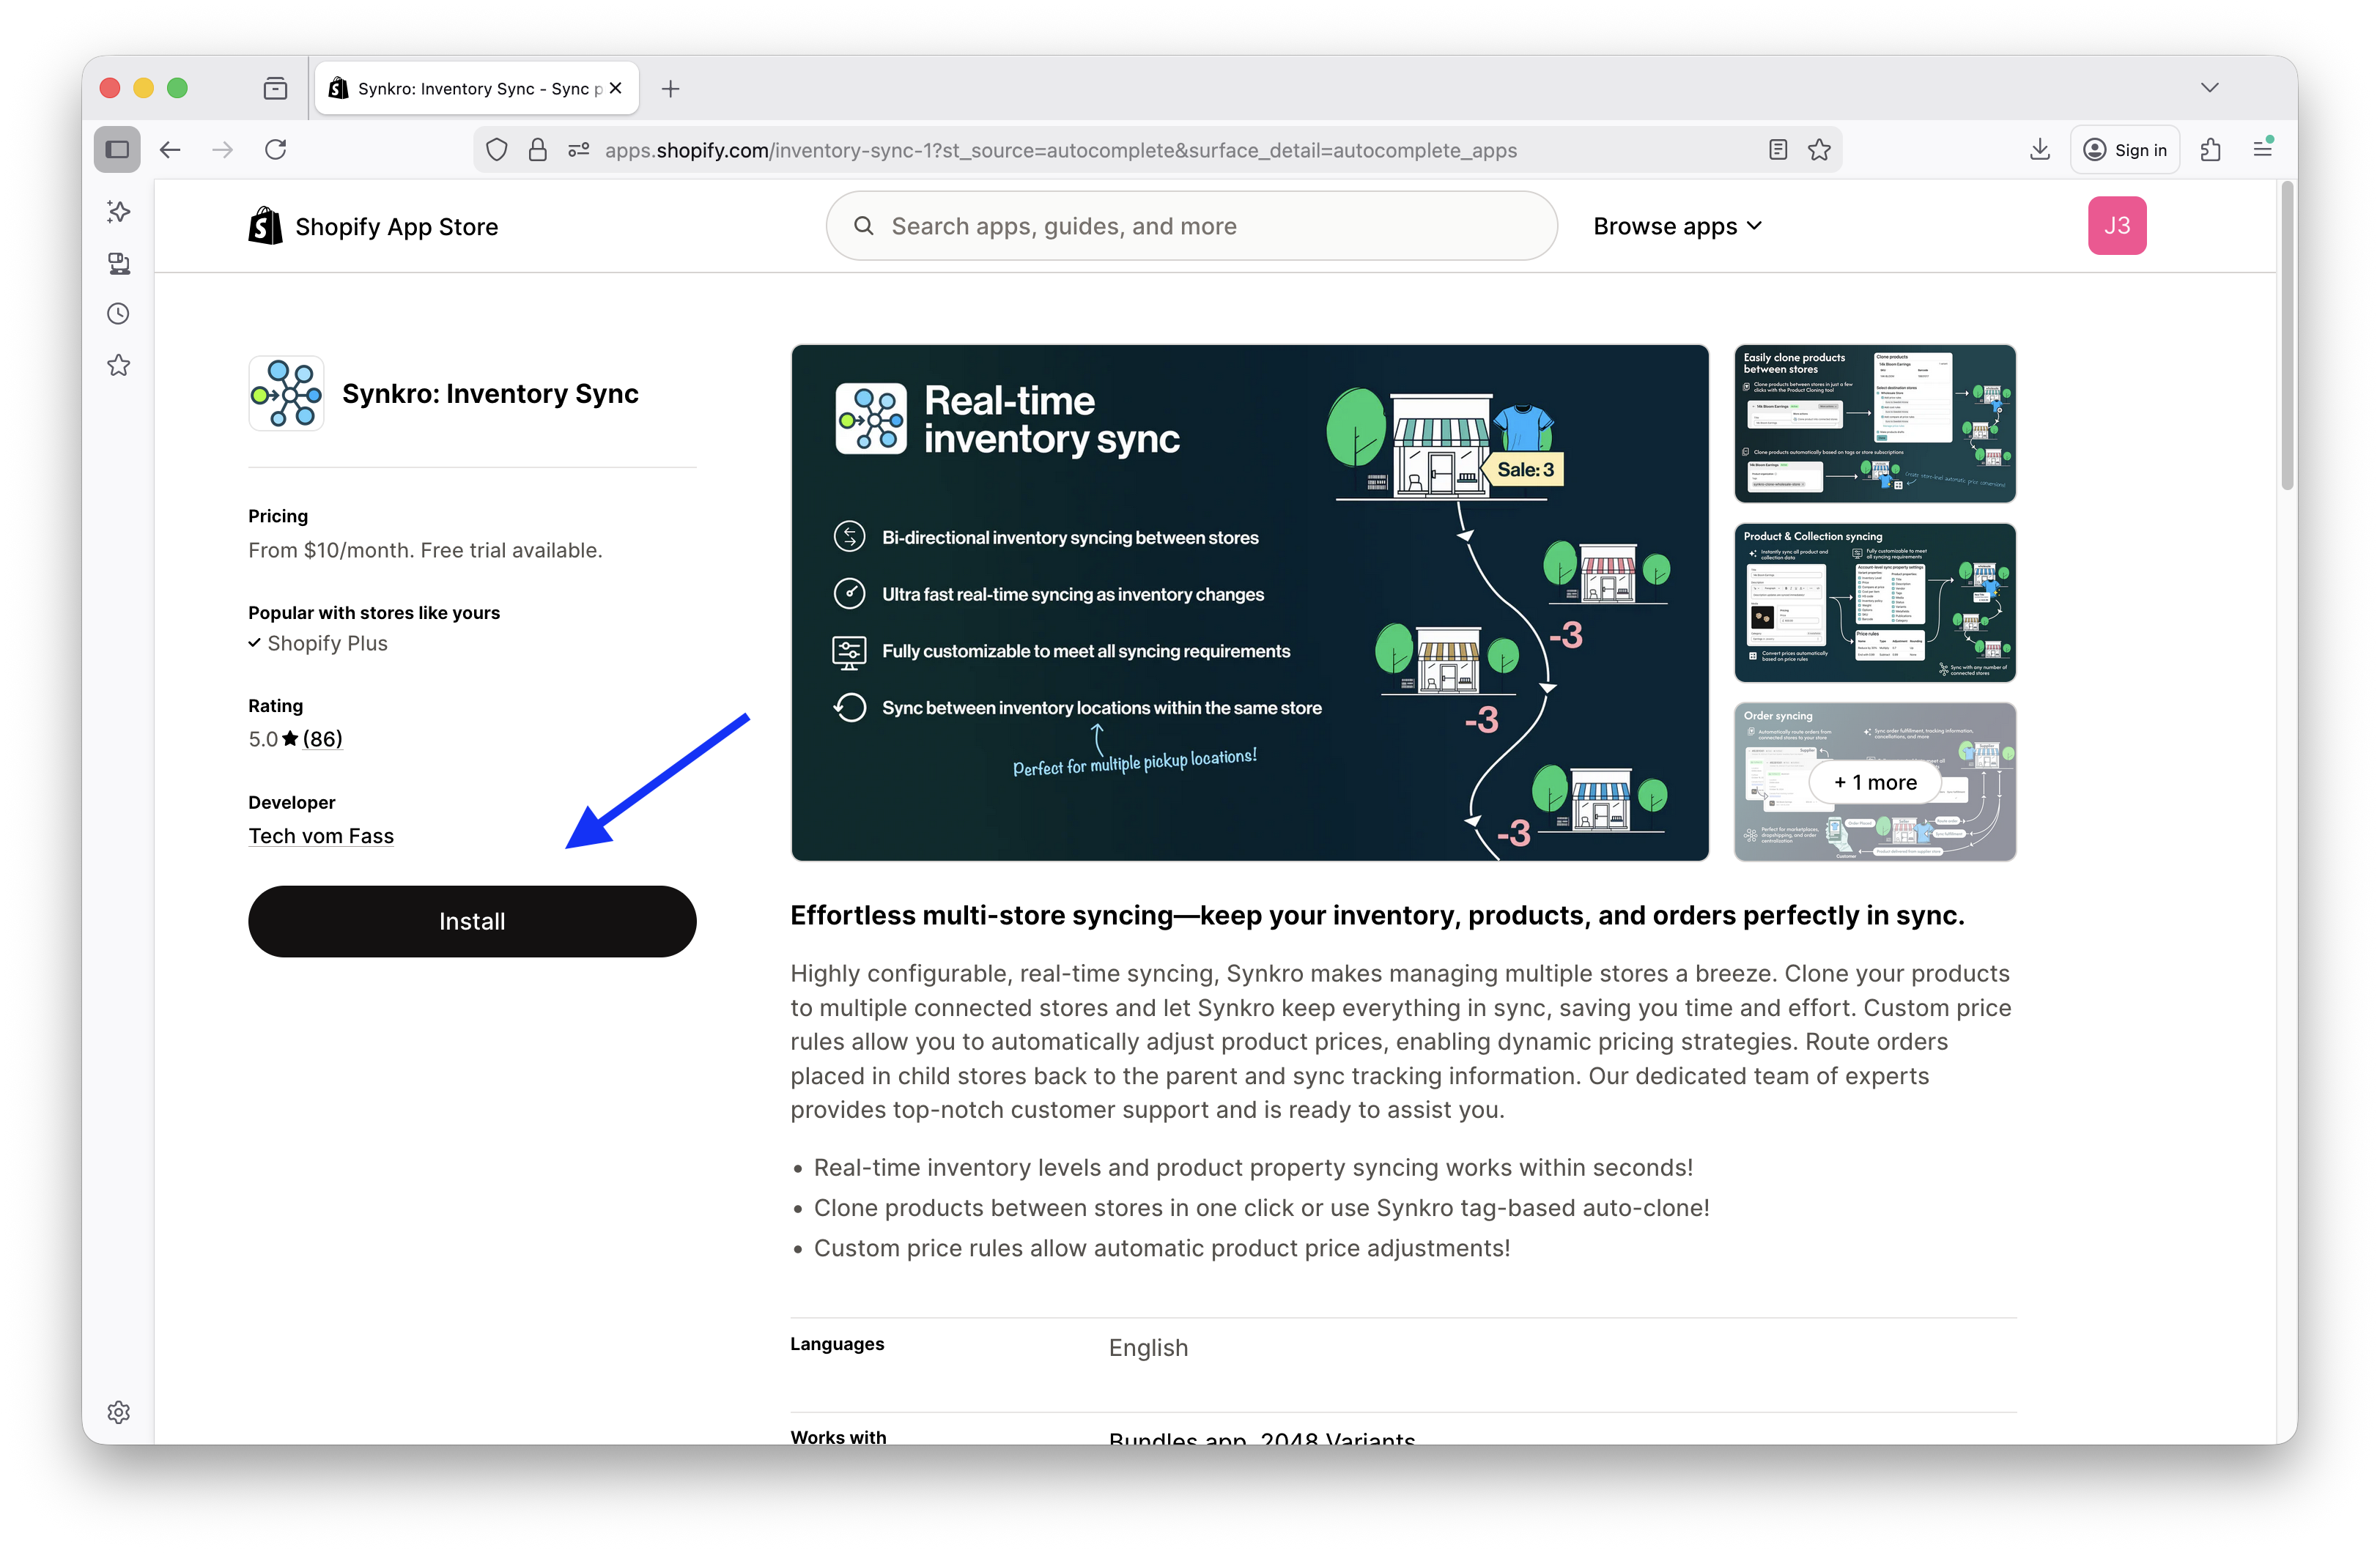 Find Synkro within the Shopify App Store and click
 Install
Step 2: Connect to your first supplier store
After completing the Synkro app installation, you will be greeted with a display prompting you to create a Synkro account, or connect to a dropship supplier via a code. To continue, insert the dropship connection code which you recieved from your dropship supplier into the Dropship connect code input and click Connect to dropship supplier.
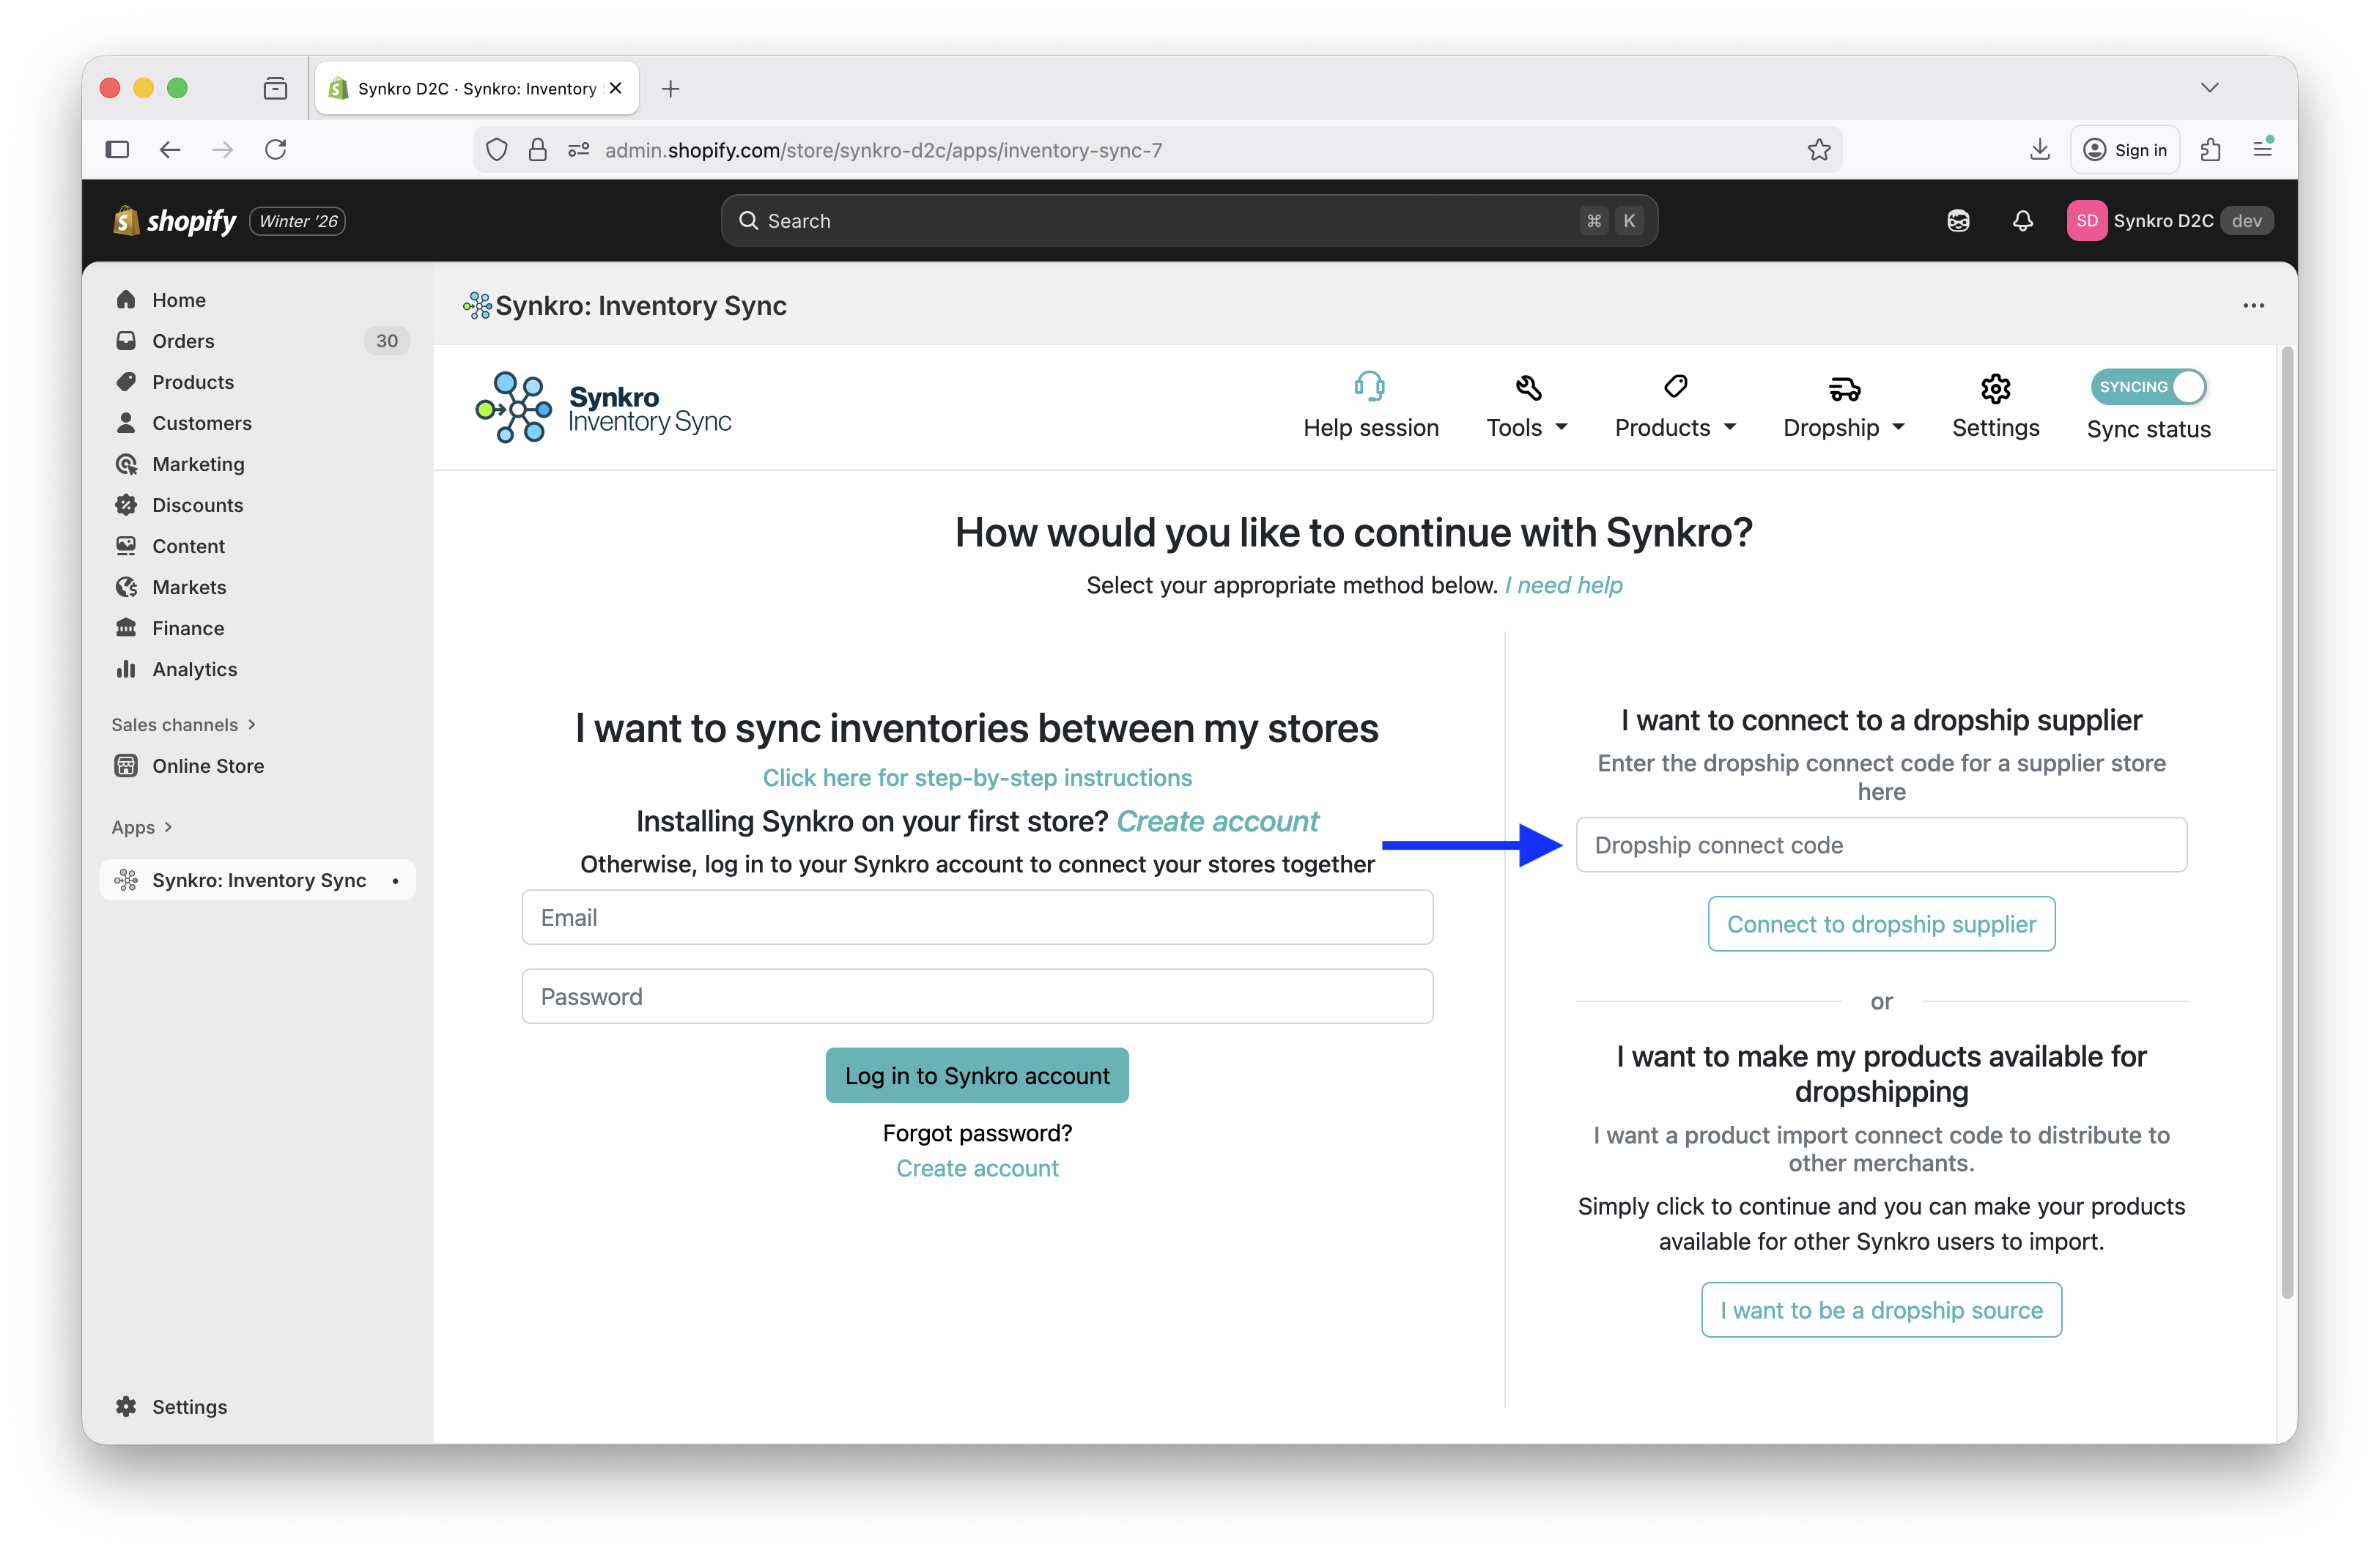 Enter dropship connect code and click
 Connect to dropship supplier
Step 3: Manage connected suppliers
In order to connect with additional suppliers or to manage existing suppliers, navitage to Dropship > Manage suppliers.
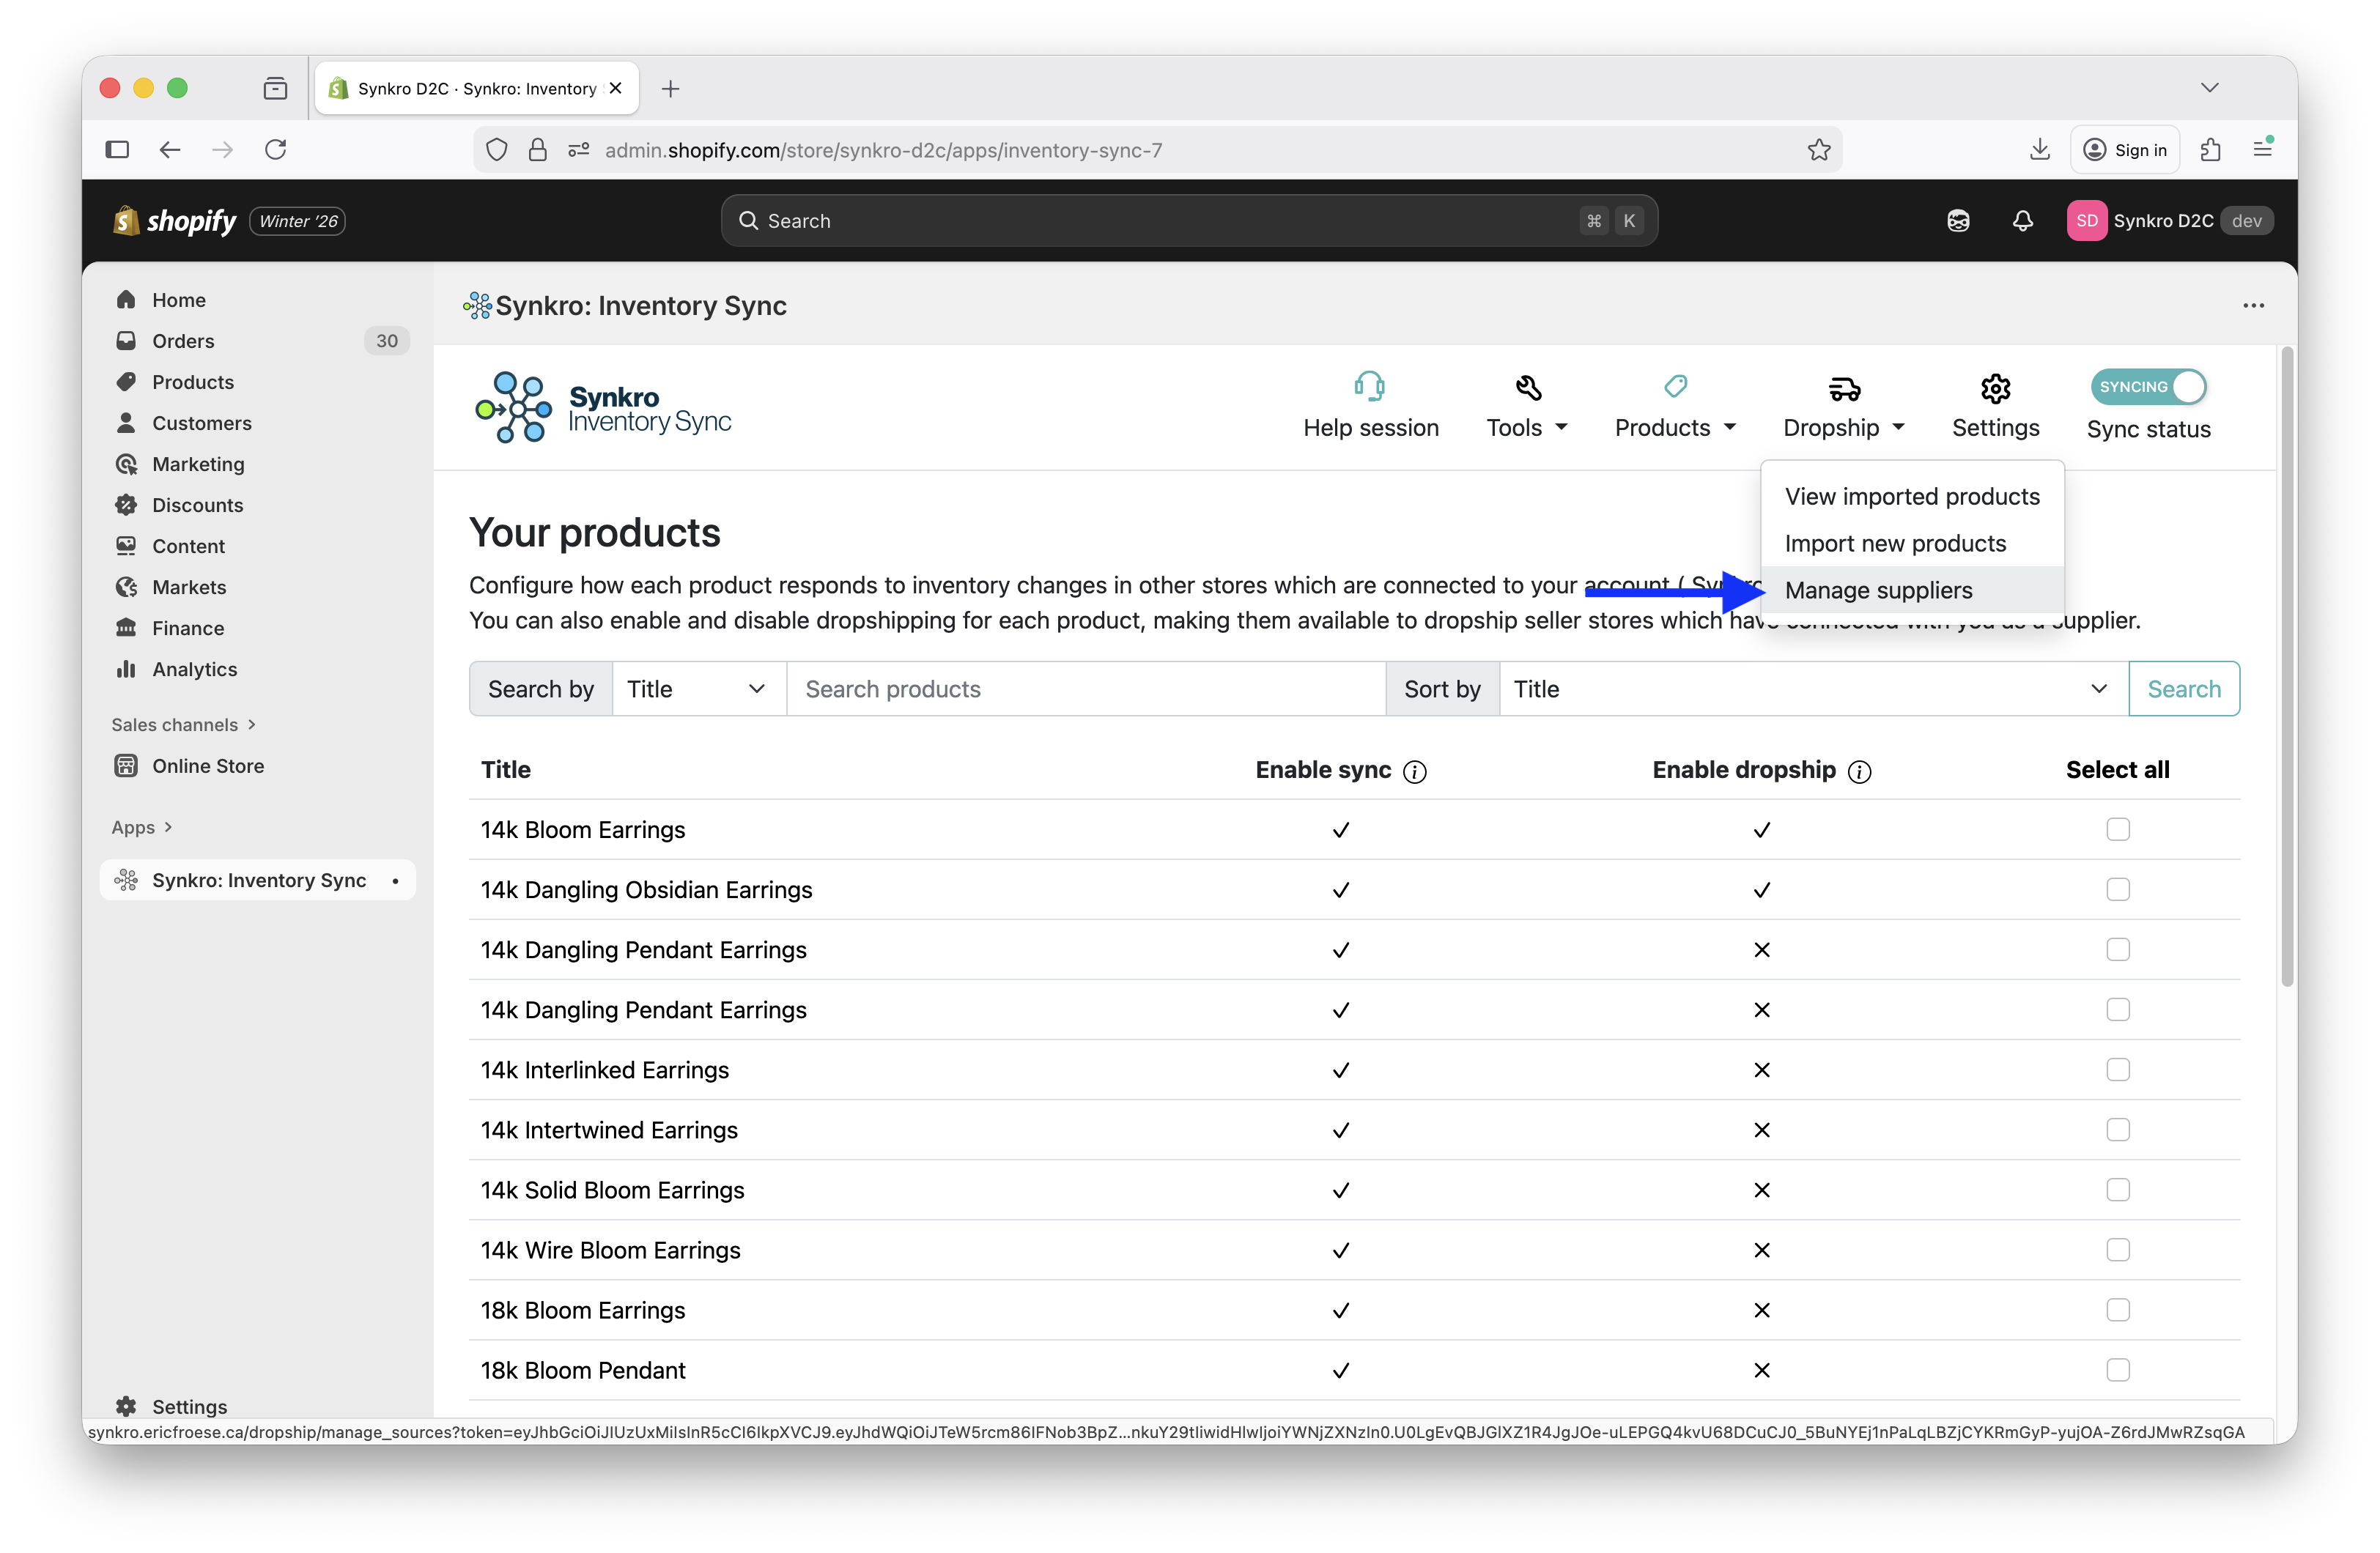 Navigate to add and manage connected supplier stores
Connecting a new dropship supplier store
Once you are in the Product import source management panel, you can connect to new supplier stores by entering their dropship connection code in the input field under the heading Connect to a new dropship supplier, then click Connect.
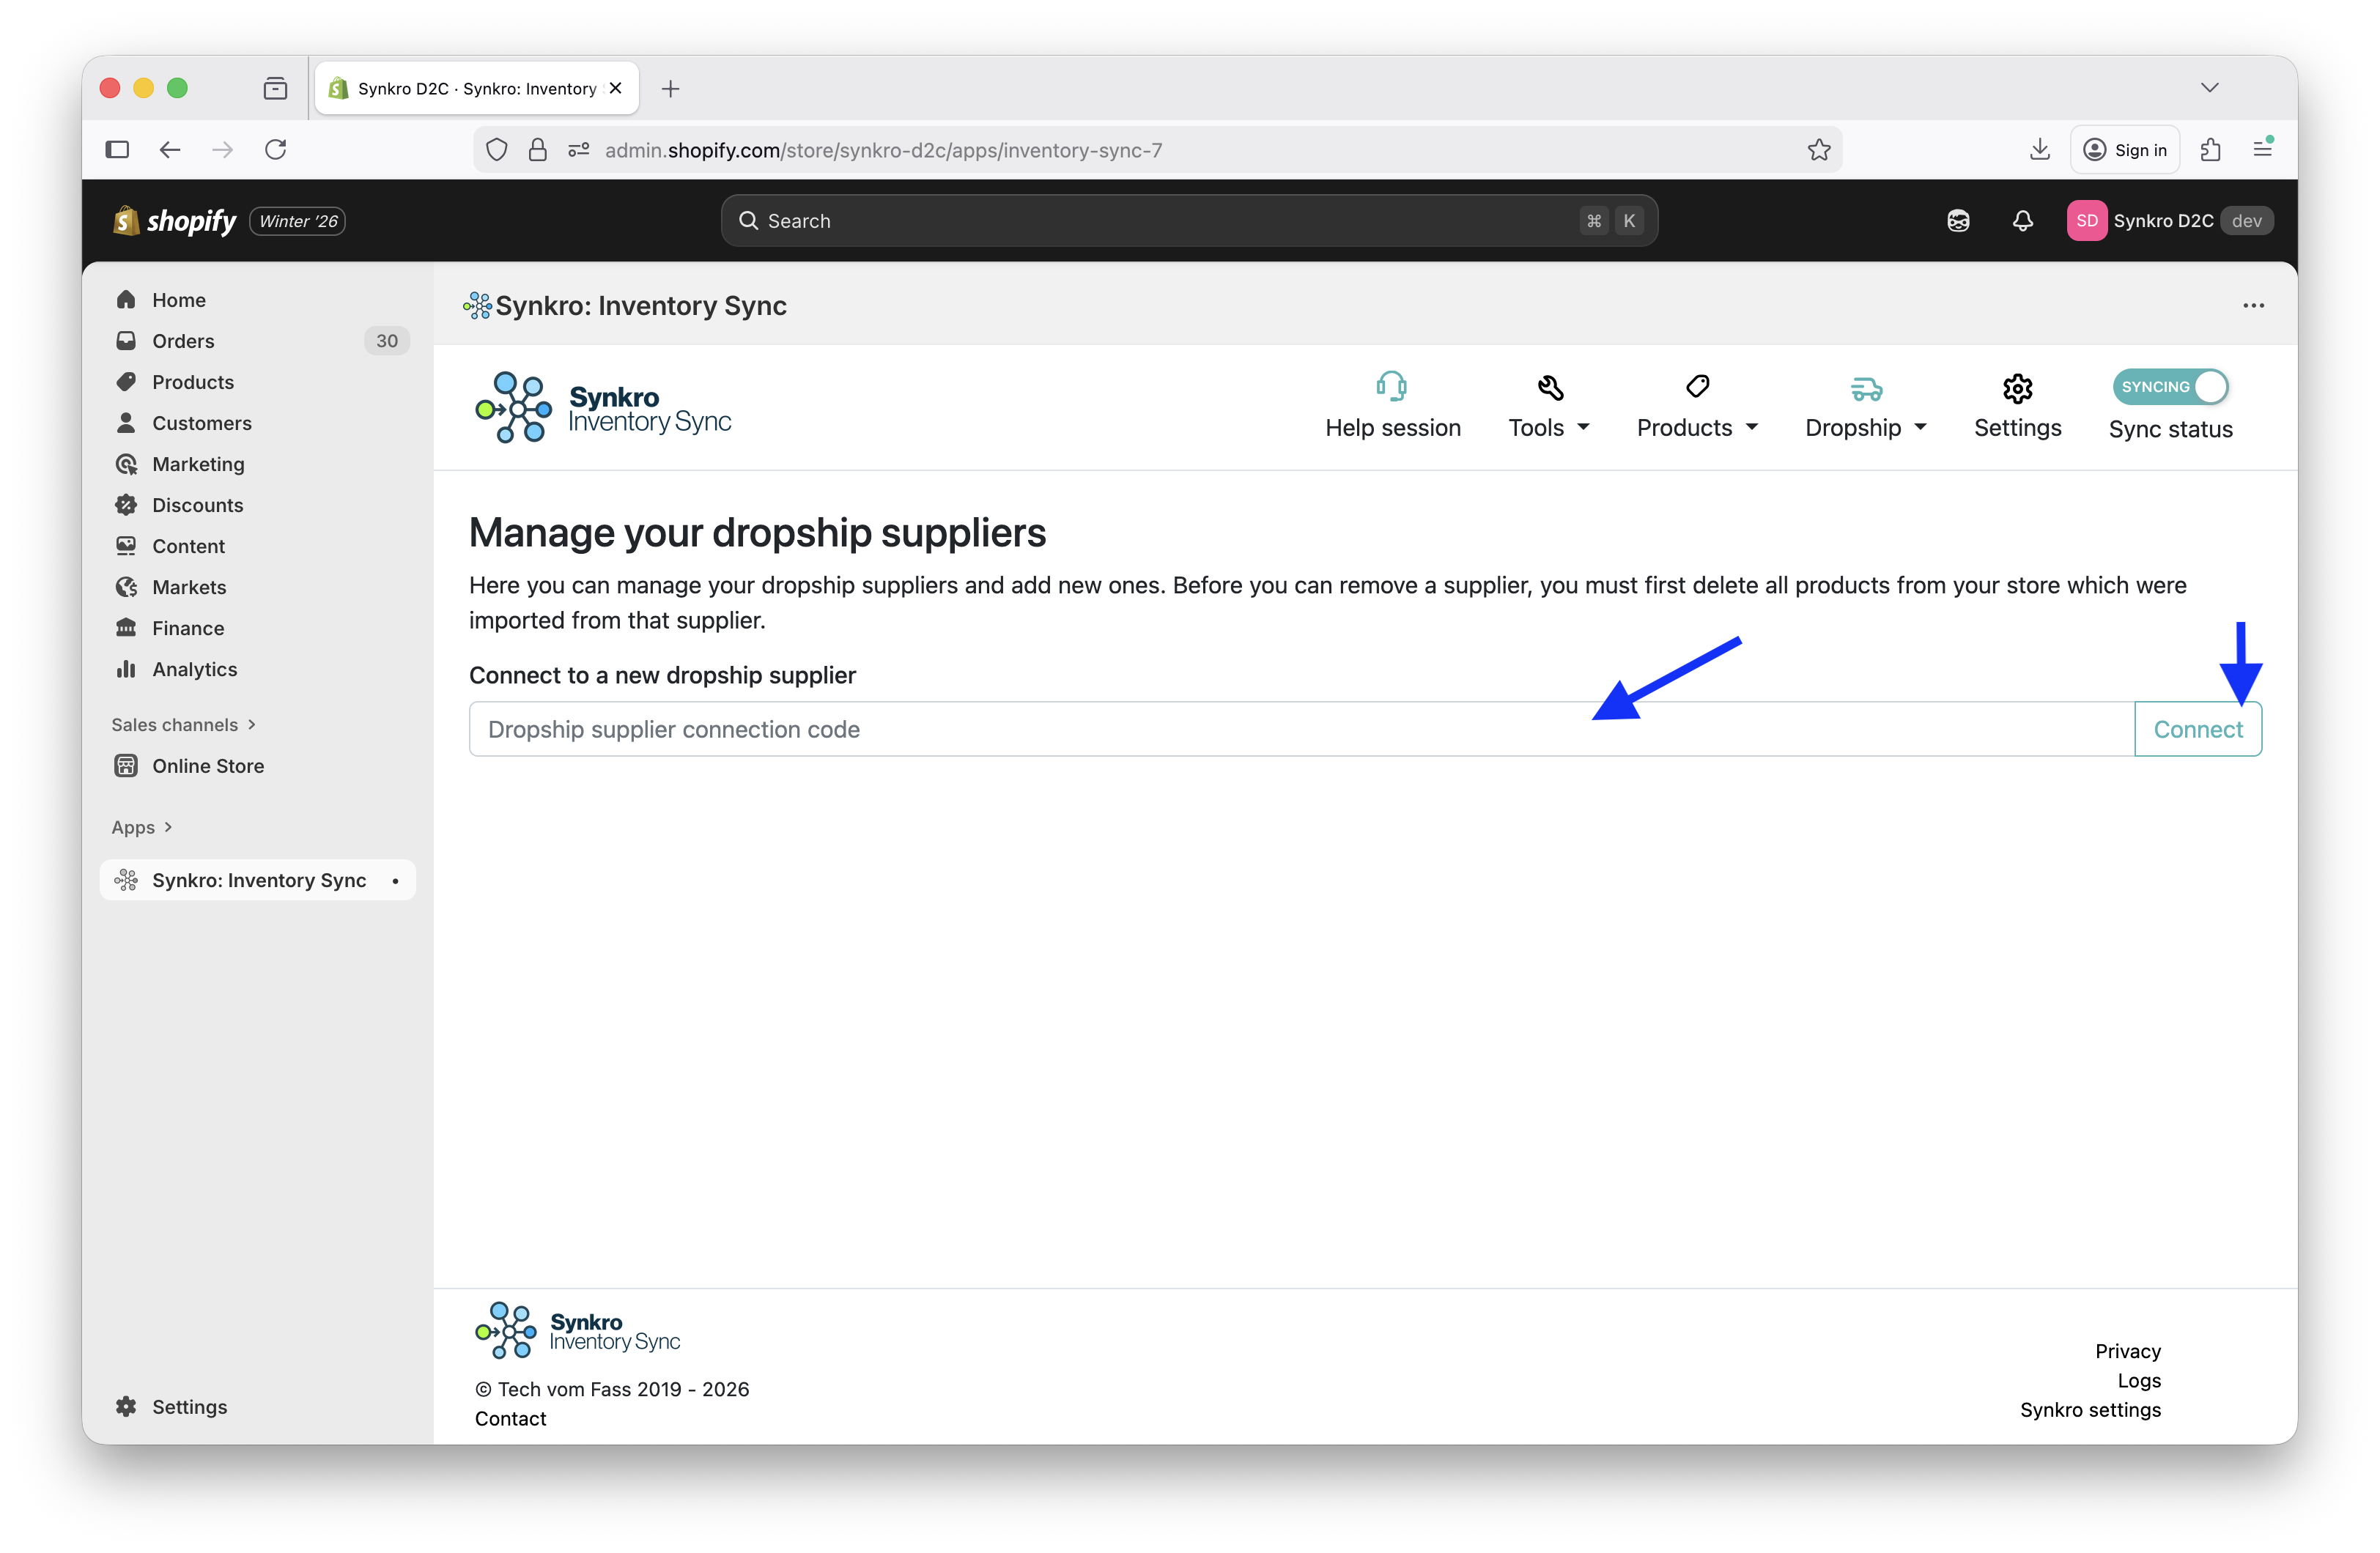 Enter code for new supplier, then click
 Connect
Removing a dropship supplier store
Before you can remove a dropship supplier store from your Synkro app, you must first delete all of the products which you’ve imported from that supplier. Once you’ve deleted their products, you can remove the supplier by clicking the Remove button under their section within your Manage product import sources page.
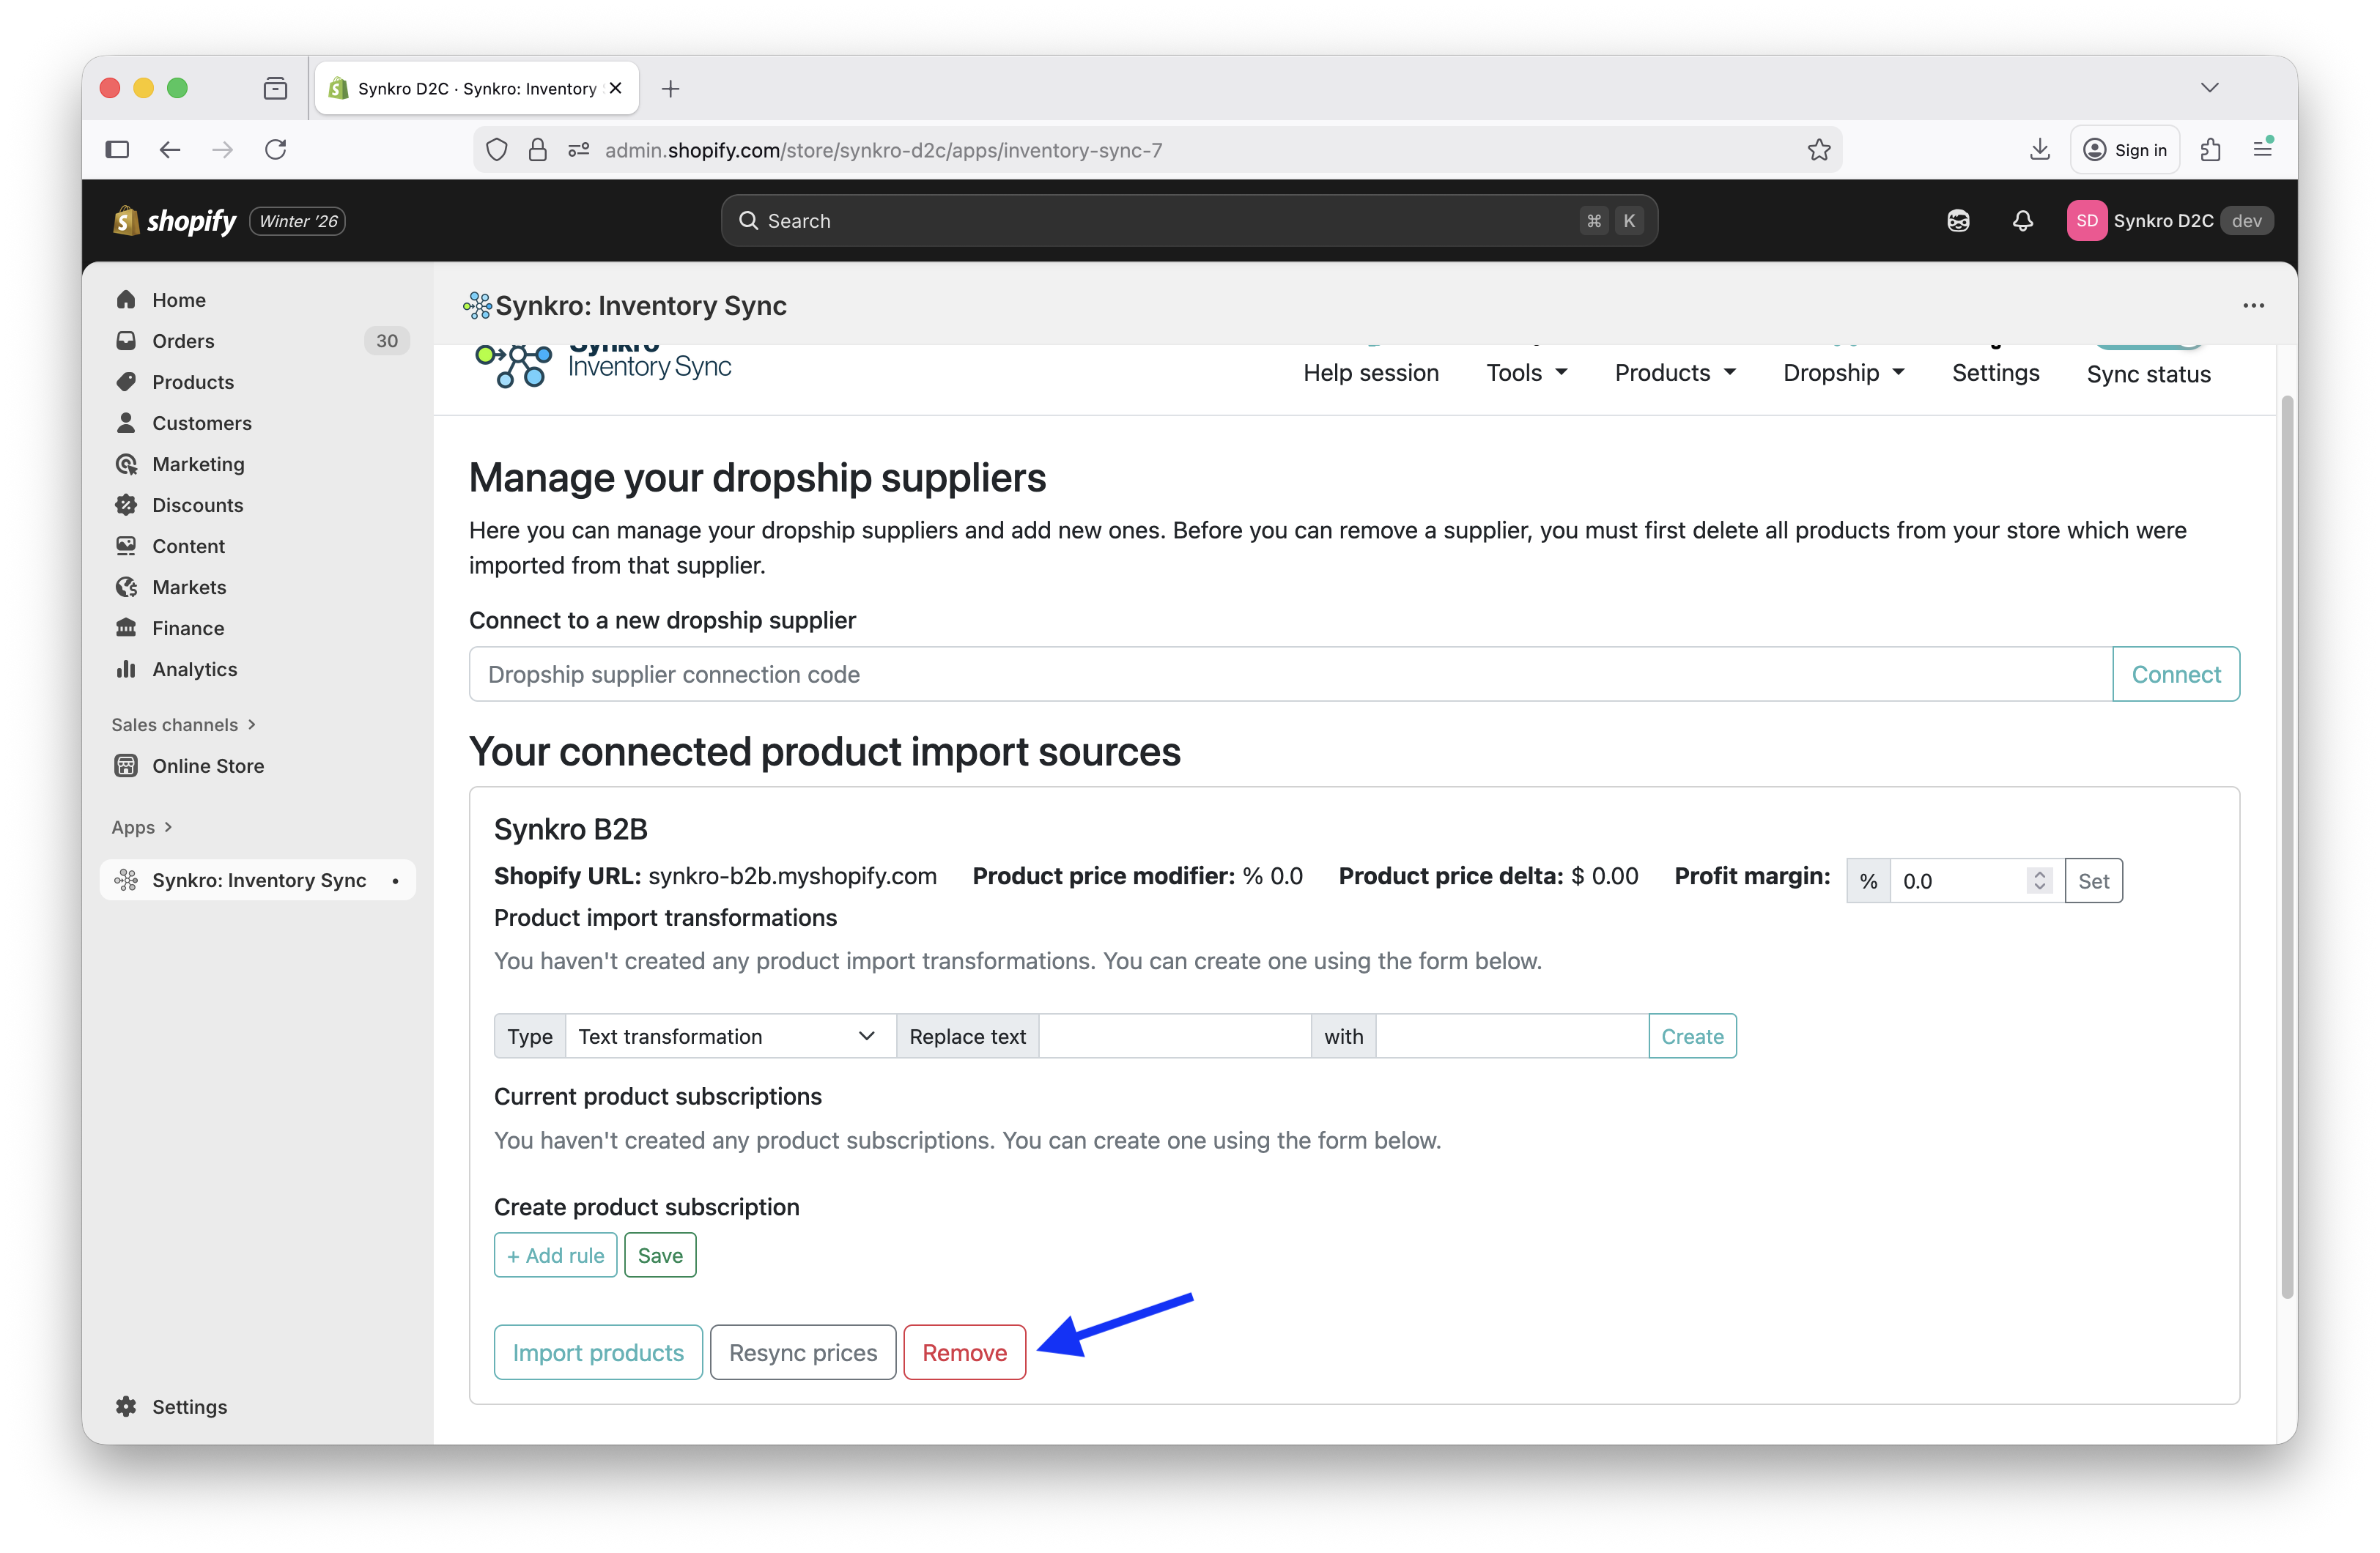 Remove supplier from your marketplace
Step 4: Importing products from a supplier
Once you’ve connected to a supplier store, you can import products from their store directly into your Shopify store. To get started, navigate to the product importing tool within the Synkro app by clicking Dropship > Import new products.
No products available?
If you are attempting to import products from a supplier store and are seeing a the following warning: “No products available for importing in example.myshopify.com”, then there are two possible explanations:
- You have already imported all available products from the supplier.
- The supplier has not enabled importing for any products in their store.
If the supplier does not have any products with importing enabled in their store, then they should follow the instructions to Enable importing for their products.
Searching for products
Once some products have been enabled for import by the supplier, you will be able to search for them from within the product import tool. Be sure to click the More filters button to tweak the search results and change the supplier store whose products you are searching.
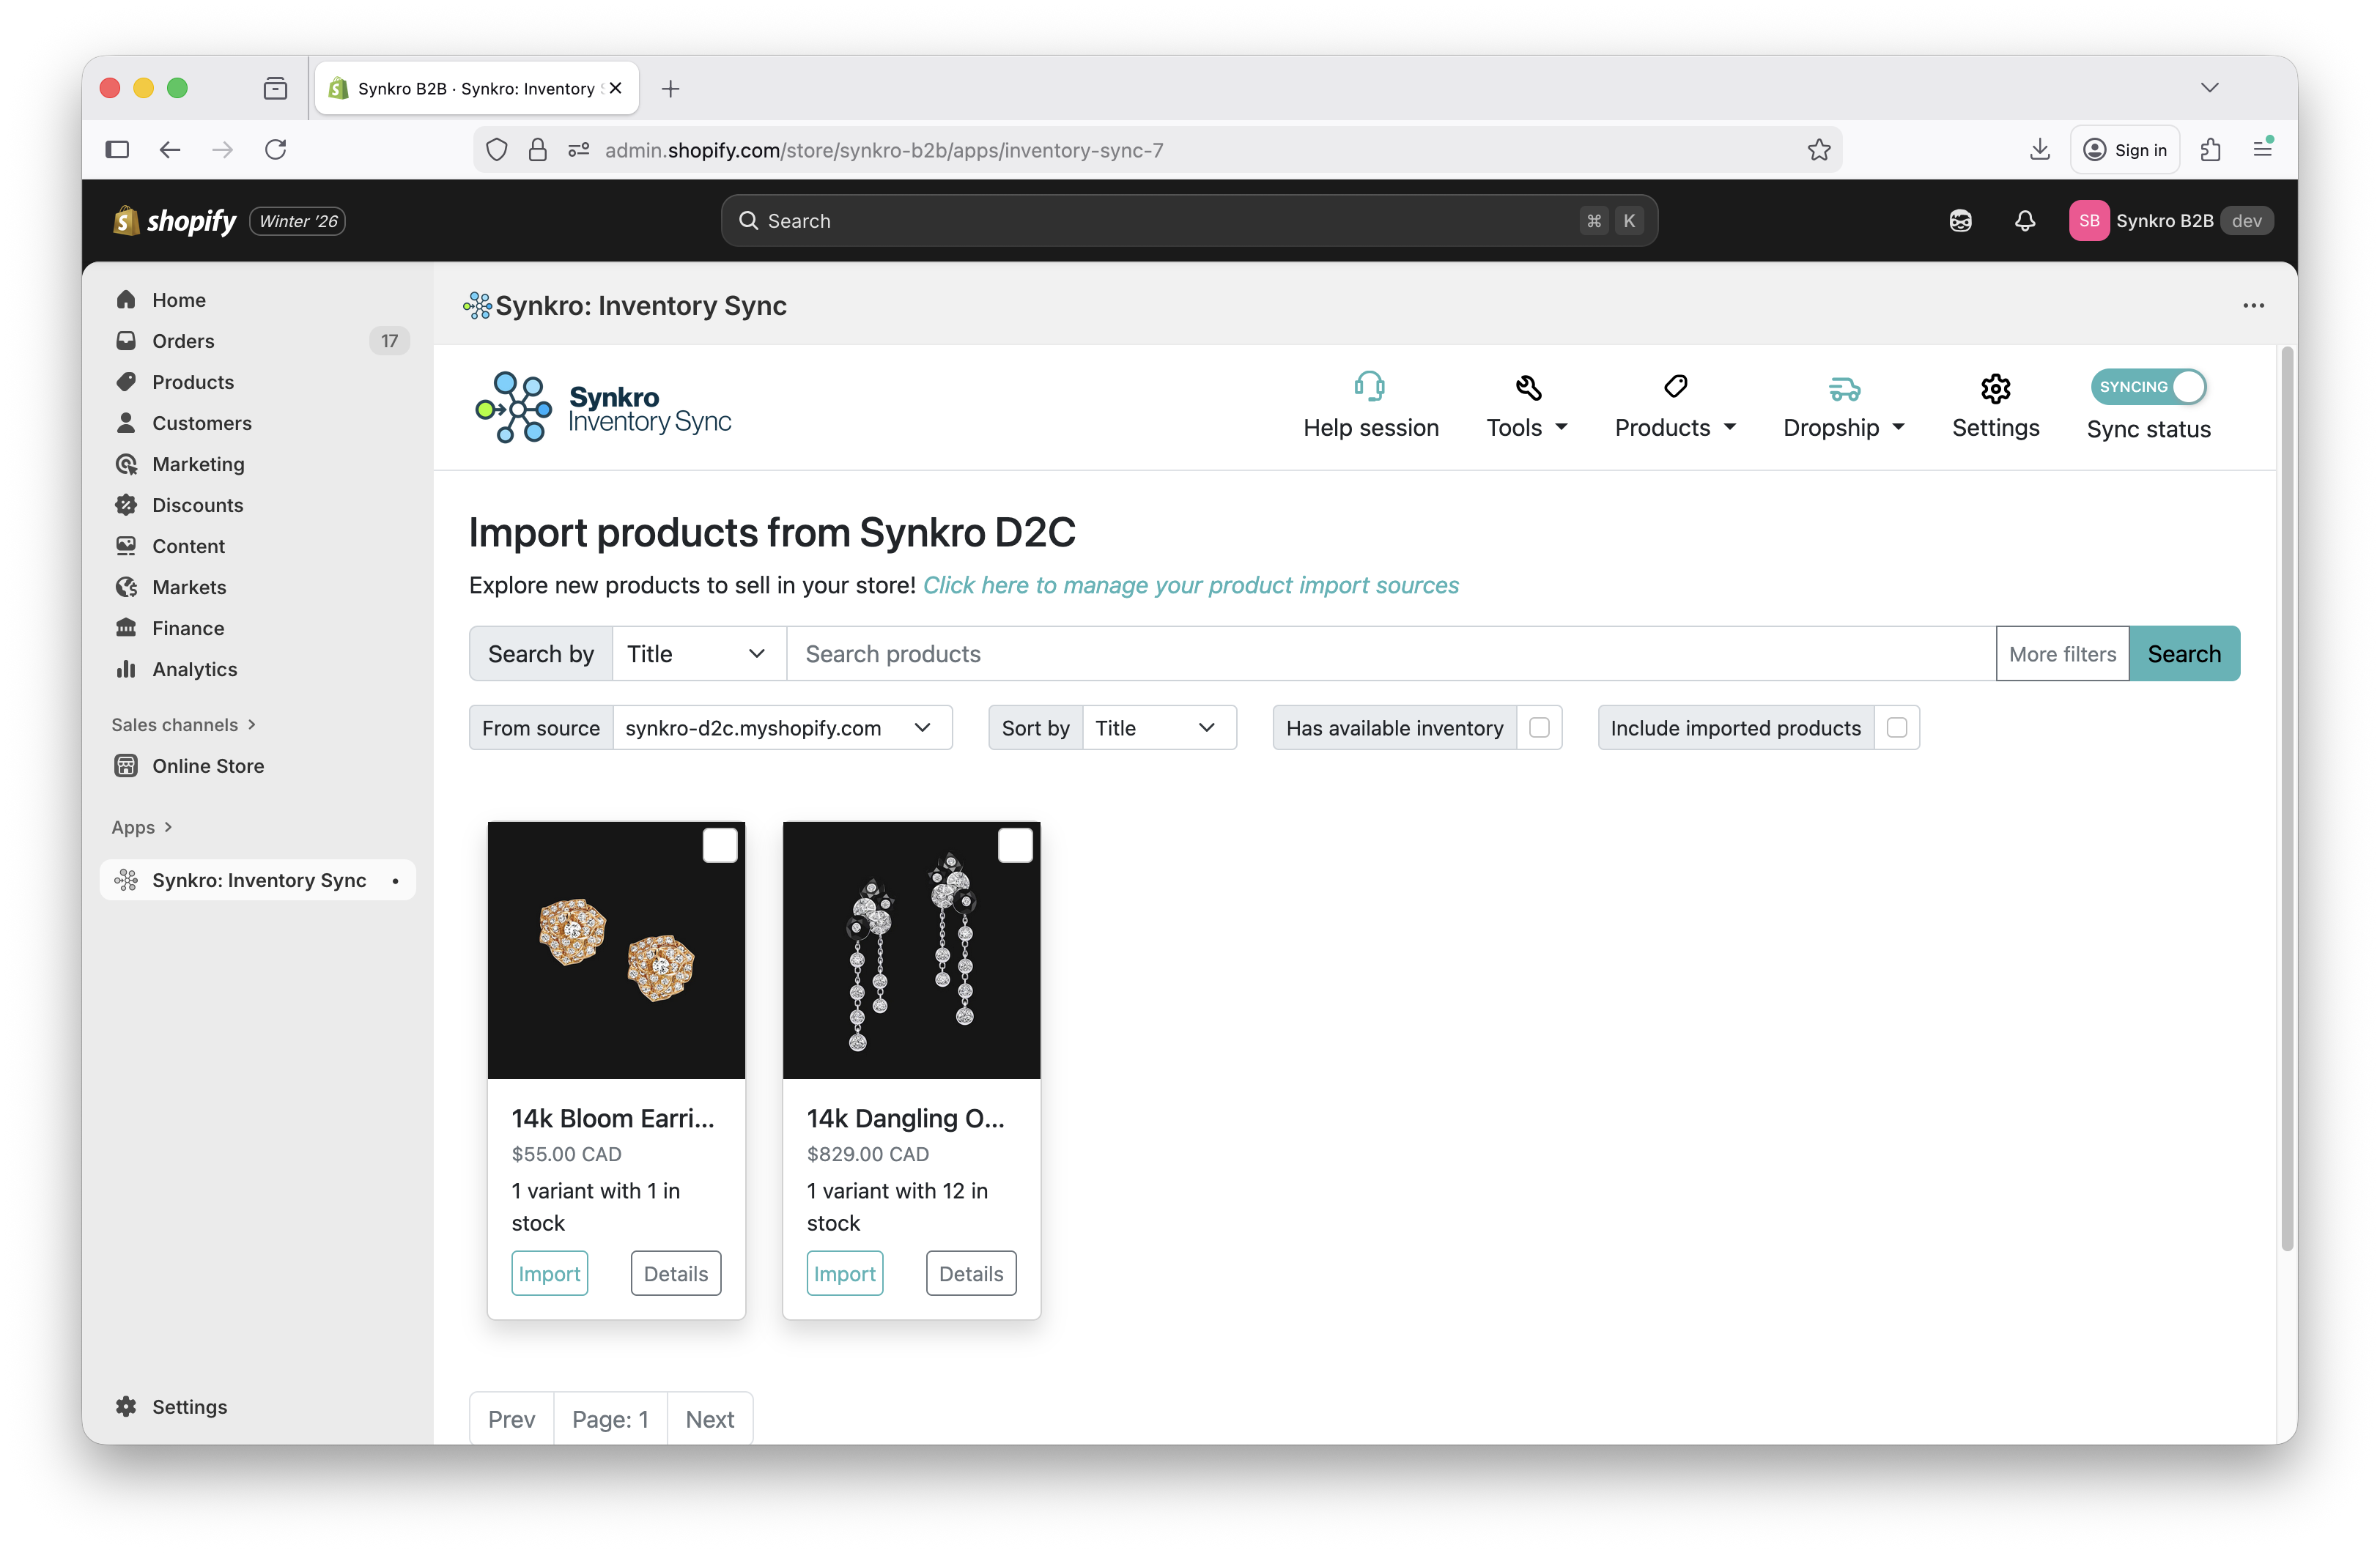 Search for products to import from supplier store
Once you have found some products to import, you can click on the Import selected button or select multiple to import products in bulk. The products will be created in your store as a “draft” to ensure ample time to make any changes to the product before switching it to “active” and start selling it in your online store.
Step 5: Add shipping rates to Synkro-powered fulfillment location
When you connect to a supplier store, Synkro will create an new “App fulfillment location” within your Shopify store. Synkro will use this location to track supplier inventory levels for products which you import into your store, separately from your store’s existing inventory locations.
Before your Shopify store will select this location to fulfill orders, you must add a shipping rate to the Synkro-powered fulfillment location.
This is also a requirement for your Shopify store to reference inventory within your store’s product detail page. Without following these steps, products which you import from your supplier may always appear as “out of stock” in your storefront - even if there is inventory present for the items in your Shopify Admin panel.
Navigate into your Shopify store settings
Within your Shopify Admininstrator panel, find the Settings button in the bottom-left corner of the page.
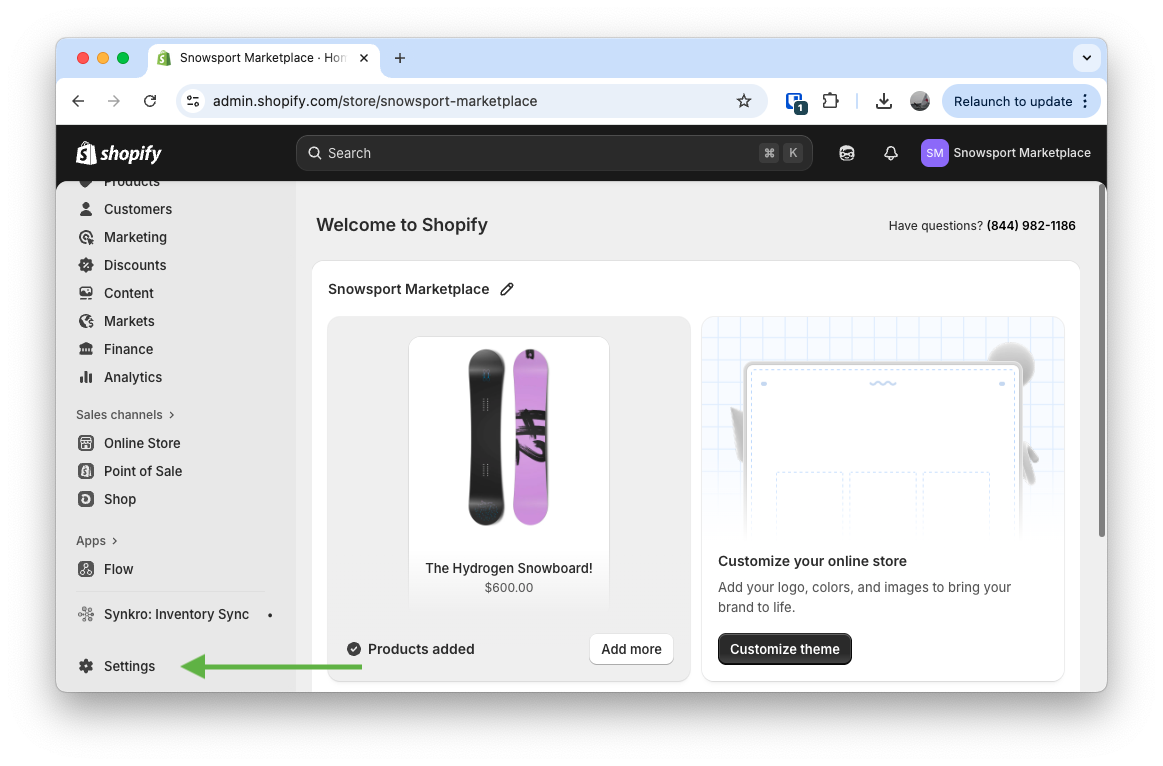 Click the
 Settings button in the bottom-left corner of the page
Open shipping rates section within “Shipping and delivery” settings
Click on the Shipping and delivery sub-menu within your Shopify settings.
Click on the shipping profile section within the Shipping and delivery settings to manage your shipping rates and add a shipping rate to the Synkro-powered fulfillment location within your store. You may notice this section say No rates for 1 location - we are going to resolve that in the next step.
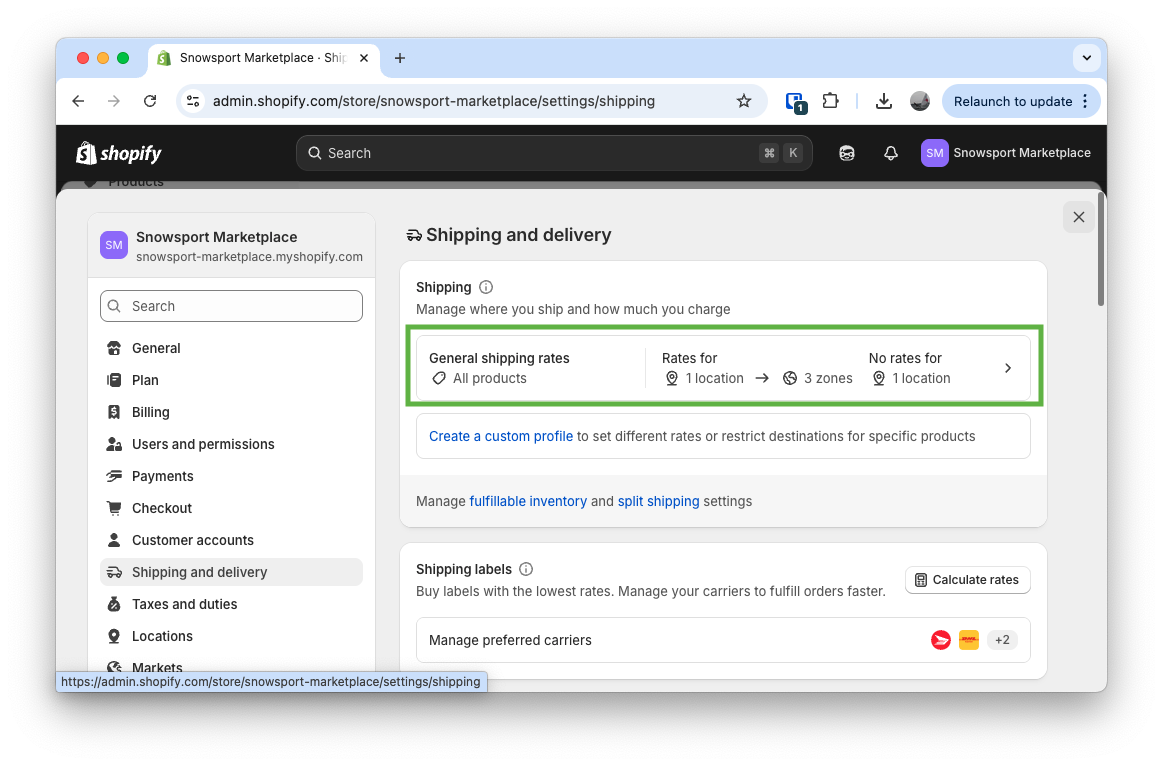 Click on the shipping profile card to add shipping rate to you Synkro-powered fulfillment location
Scroll to section labeled “Not shipping from this location”
Scroll through the sections of the Shipping Profile page and find the heading labeled Not shipping from this location. Find the Synkro-powered location, which will be labelled similar to “supplier-store (via Synkro)”. Beside that location, click Add rates > Use rates from another location.
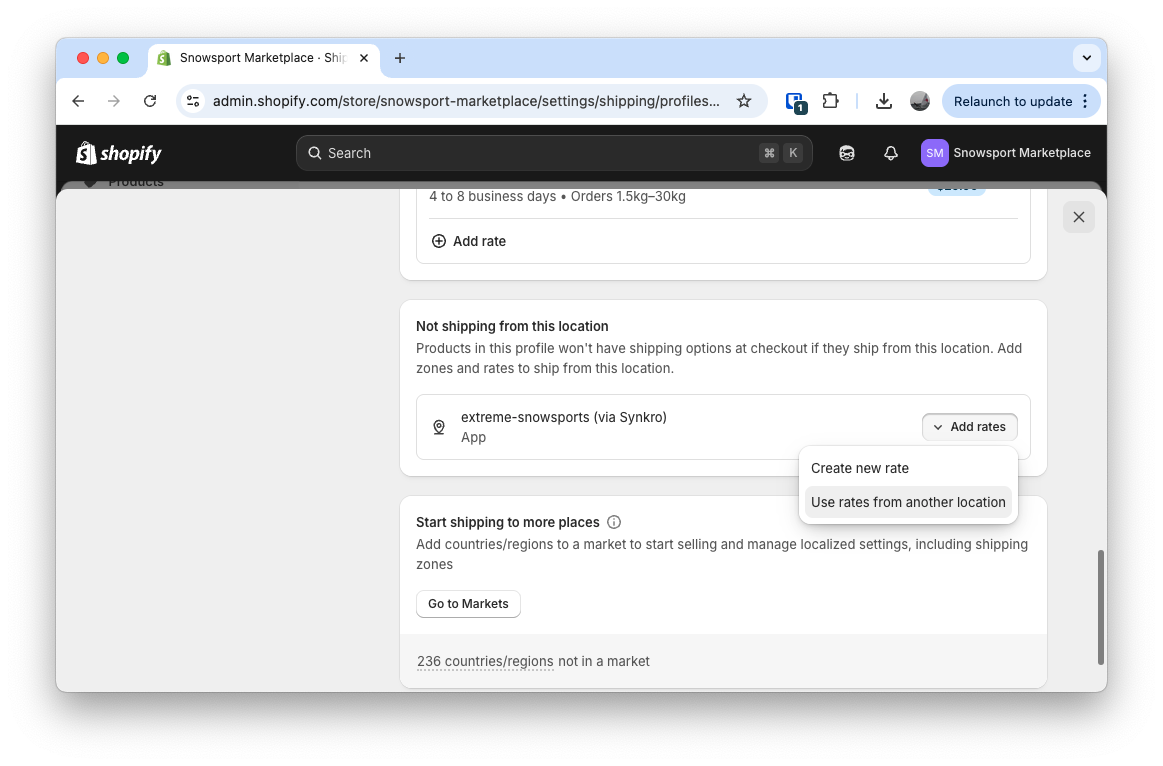 Find Synkro-powered location under
 Not shipping from this location section, then click Add rates > Use rates from another location
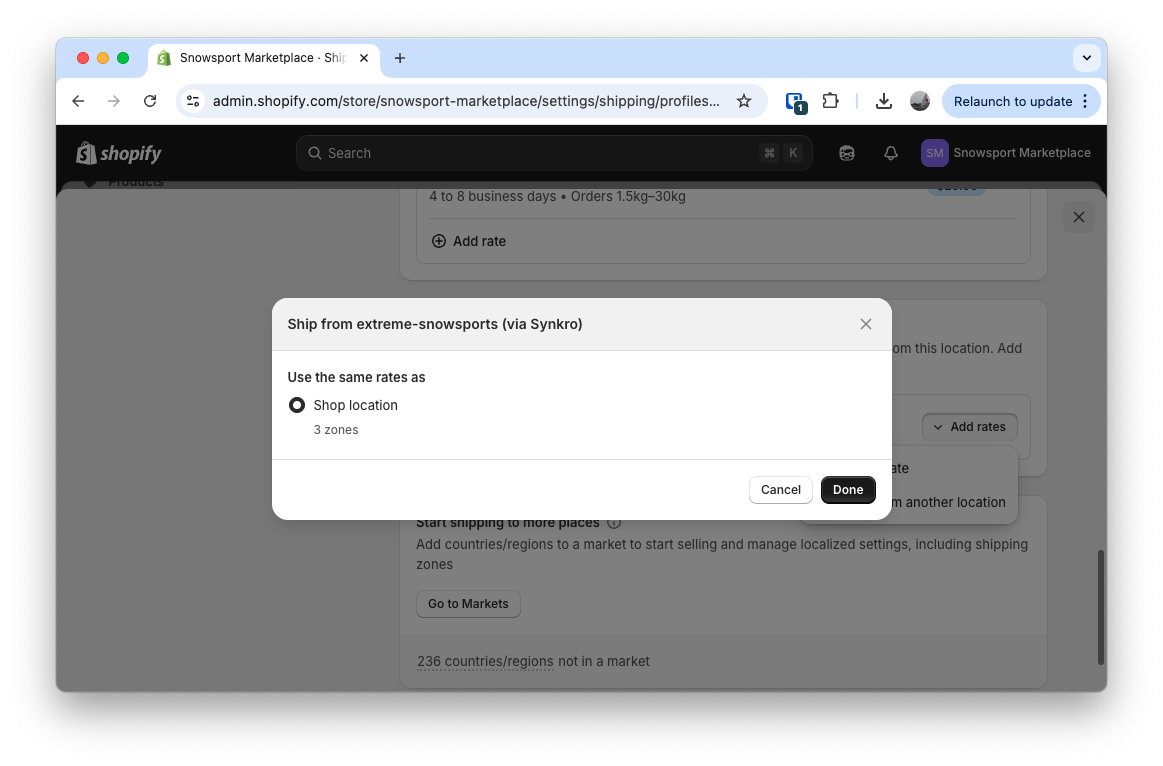
Assign a shipping rate to the Synkro-powered fulfillment location
You may use the same shipping rates as your default shipping profile, or select a different shipping profile to more accurately charge for shipping as required by your supplier. As a final step, don’t forget to click Save.
 Select a shipping profile for the Synkro-powered fulfillment location
Now that you have assigned a shipping profile to the Synkro-powered fulfillment location, your Shopify store will be able to properly calculate shipping rates for your supplier’s products while the customer goes through the checkout process. Please note that this is also a requirement for your store to reference inventory within your store’s product detail page. Without following these steps, products which you import from your supplier may always appear as “out of stock” in your storefront - even if there is inventory present for the items in your Shopify Admin panel.
Need Help?
Contact our support team at support@synkro-app.com for assistance with setting up your dropship seller store.